OpenVPN DDWRT to IPFire Site-to-Site
Needless to say, I searched around Google for a while one night before I was able to get this to work. So, I will make this (somewhat) easy on you.
The OpenVPN IPFire end-point that you are attempting to get your DDWRT router connected to should have all the usual stuff configured. You will need of course to set up your certificate authorities and keys inside IPFire's OpenVPN configuration as you will need these to put into your DDWRT router.
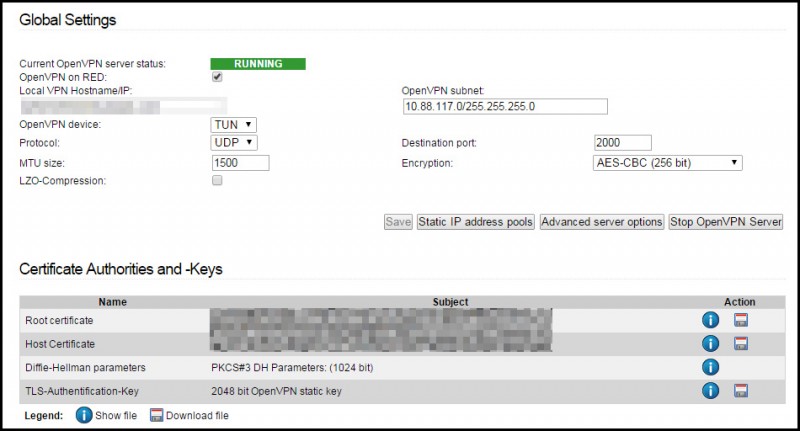
Basic OpenVPN Server Settings
Here are some screenshots of how mine is currently configured:
You will need to download the three floppy disk icons on the Certificate Authorities and Keys section. This is only because (as far as I could tell), OpenVPN configuration on the DDWRT router that I'm currently using does not want to use PKCS12 files. :sadface:
Advanced OpenVPN Server Options
There are some additional configuration changes I made -- mostly because I'm using a higher bit hash algorithm in my advanced settings. Here's a screenshot:
Unfortunately, I found that while the VPN server was checked as being the TLS Authorizer, the connection would constantly fail. Therefore, I have it disabled at this time. If you know of a fix, please let me know!
There is no need to add the route push options or any other options assuming you are just going to be accessing this over the VPN and not using it for a tunnel of any sort. If you DO you want route ALL of your traffic through the VPN to the IPFire VPN server (for whatever reason), then you will want to keep reading.
OpenVPN Host Profile (Client)
You will need to create a connection profile for the host. I'll give you a hint. The "host" you are creating this for is your DDWRT router and will allow your entire home network to access everything that is behind the IPFire OpenVPN server.
Back at the main configuration page for OpenVPN, find the Connection Status and Control section and click Add to create a new host (for your DDWRT device).
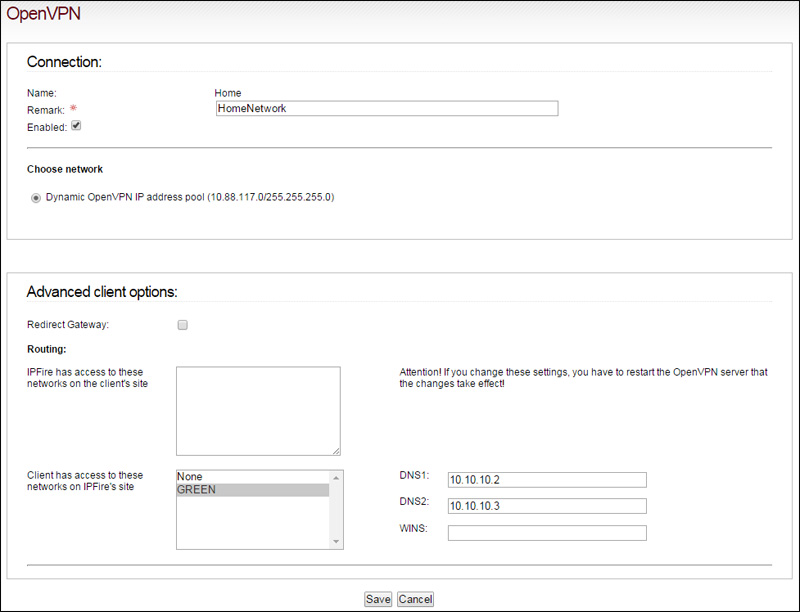
In the next page you will need to change a couple of options.
The interesting part here is that you can in fact check the option to redirect gateway. For those of you that wanted to route all of your traffic over the internet via VPN and through the IPFire box, here is the box you want to check.
This will tell your DDWRT router to redirect all traffic to the IPFire server so that the IPFire server acts as the new default gateway for nodes on your LAN at home or wherever you're at right now.
You will want to make sure that the client has access to the GREEN networks on IPFires side. This will give you access to the nodes that are on the LAN's private range behind the IPFire server. Currently I have one storage server setup using this technique that I access when needed.
Once you're done editing this configuration for the new host info, go ahead and click Save.
Getting the OpenVPN Keys to the Castle
From the main screen, you should see the host you've just configured.
- Download the PKCS12 package that it comes with.
- Head over to SSLShopper and use the converter in the link provided.
- This will convert your PKCS12 file over to a readable format.
- Open this in WordPad (or your favorite Editor, probably notepad2)
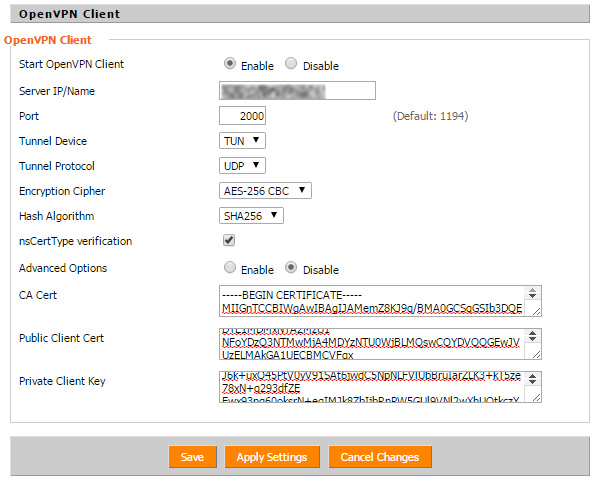
Once you have the <clientpackage>.pem file downloaded and opened, you will see three different sections. Each of these has its place on the DDWRT OpenVPN Client settings.
Each "Section" I will be referring to will begin with:
-----BEGIN CERTIFICATE-----
..and end with..
-----END CERTIFICATE-----
(except for the private key)
- Section 1 goes in the "Public Client Cert" text area.
- Section 2 goes in the "CA Cert" text area.
- Section 3 goes in the "Private Key" text area.
After this has been added, you should click on Save. Once it is saved and reloads, click on Apply Settings.
That should be it. You can goto Status > OpenVPN on the DDWRT router to see it connecting. For some reason, I see the following a lot:
20150320 21:07:26 MANAGEMENT: Client connected from [AF_INET]127.0.0.1:16
20150320 21:07:26 D MANAGEMENT: CMD 'state'
20150320 21:07:26 MANAGEMENT: Client disconnected
20150320 21:07:26 MANAGEMENT: Client connected from [AF_INET]127.0.0.1:16
20150320 21:07:26 D MANAGEMENT: CMD 'state'
20150320 21:07:26 MANAGEMENT: Client disconnected
20150320 21:07:26 MANAGEMENT: Client connected from [AF_INET]127.0.0.1:16
20150320 21:07:26 D MANAGEMENT: CMD 'log 500'
20150320 21:07:26 MANAGEMENT: Client disconnected
20150320 22:00:57 MANAGEMENT: Client connected from [AF_INET]127.0.0.1:16
From what I've been able to find online, this is normal behavior for the routers software and does not seem to affect the connection at all.
Once it has connected, you should be able to ping and access the IPFire server with whatever network you set up on the GREEN interface.
[root@eos ~]# hostname -I
10.10.10.2 10.10.10.3 10.10.10.4
[root@eos ~]# ping 10.10.11.1
PING 10.10.11.1 (10.10.11.1) 56(84) bytes of data.
64 bytes from 10.10.11.1: icmp_seq=1 ttl=63 time=70.3 ms
64 bytes from 10.10.11.1: icmp_seq=2 ttl=63 time=73.6 ms

--- 10.10.11.1 ping statistics ---
3 packets transmitted, 2 received, 33% packet loss, time 2065ms
rtt min/avg/max/mdev = 70.330/71.981/73.633/1.673 ms
[root@eos ~]# ping 10.10.11.2
PING 10.10.11.2 (10.10.11.2) 56(84) bytes of data.
64 bytes from 10.10.11.2: icmp_seq=1 ttl=62 time=77.6 ms
64 bytes from 10.10.11.2: icmp_seq=2 ttl=62 time=64.6 ms

--- 10.10.11.2 ping statistics ---
2 packets transmitted, 2 received, 0% packet loss, time 1261ms
rtt min/avg/max/mdev = 64.676/71.141/77.607/6.470 ms
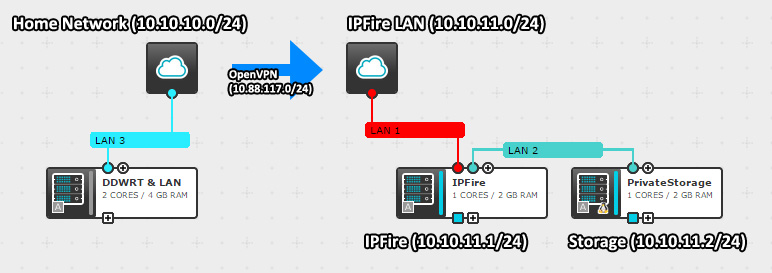
For those of you wanting a visual representation of the networks in use, here is a small diagram (I don't have Visio, deal with it!):


